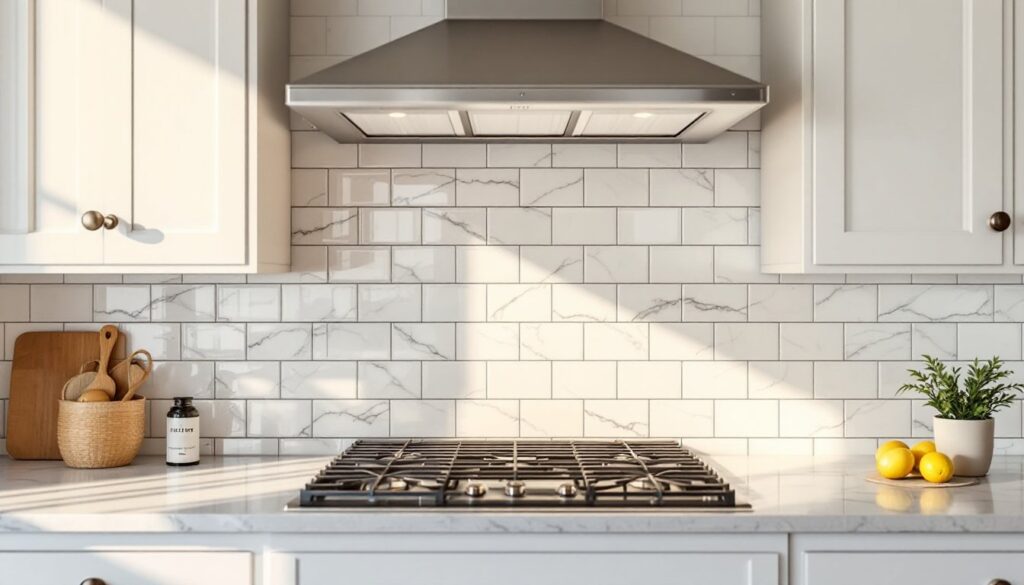
Marble has graced luxury kitchens for centuries, and today’s homeowners are rediscovering why. A marble kitchen backsplash brings natural beauty and sophisticated texture that manufactured materials can’t quite replicate. Each slab carries unique veining patterns, no two installations look identical. But marble isn’t just about aesthetics. It’s heat-resistant, naturally cool (ideal for rolling dough), and when properly sealed, surprisingly durable for vertical applications. Whether a homeowner is planning a full kitchen renovation or a targeted upgrade, understanding marble’s characteristics, installation requirements, and maintenance needs helps ensure the investment pays off in both function and style.
Table of Contents
ToggleKey Takeaways
- A marble kitchen backsplash combines heat-resistance and natural beauty with unique veining patterns that hide grout lines and imperfections better than solid-color tiles.
- Marble is porous and reactive to acids, so lemon juice, tomato sauce, and vinegar can etch the surface—requiring prompt cleanup and annual sealing to maintain protection.
- Carrara marble offers affordable versatility at $8–$18 per square foot, while dramatic Calacatta ($15–$40+) and premium Statuario ($30–$100+) suit accent installations and statement focal areas.
- Proper installation requires cement backer board, white thinset mortar for natural stone, a wet saw with diamond blade, and professional help for heavy slab backsplashes to prevent failure.
- Daily maintenance with pH-neutral cleaners and immediate spill cleanup, combined with 6–18 month resealing intervals, keeps marble backsplashes pristine for decades while developing a natural patina over time.
Why Choose Marble for Your Kitchen Backsplash?
Marble offers several practical advantages beyond its obvious visual appeal. The stone’s heat resistance makes it ideal behind cooktops and ranges, splattered grease wipes away without scorching or discoloring the surface. Unlike painted drywall or wallpaper, marble won’t bubble, peel, or fade from steam and heat exposure.
The natural veining in marble creates visual movement that hides minor imperfections and grout lines better than solid-color tiles. Calacatta and Carrara varieties, with their gray and gold veining, complement both warm and cool kitchen palettes. This versatility means marble pairs well with butcher block counters, quartz, granite, or even concrete.
From a resale perspective, marble signals quality. Real estate agents consistently note that natural stone features, especially marble, appeal to buyers looking for upscale finishes. The material reads as permanent and intentional, not trendy.
That said, marble is porous and reactive to acids. Lemon juice, tomato sauce, and vinegar can etch the surface, leaving dull spots. A backsplash sees less direct food contact than a countertop, which reduces (but doesn’t eliminate) etching risk. Homeowners who cook frequently with acidic ingredients should weigh this factor carefully. Sealing helps, but it’s not armor plating, marble requires respect and routine care.
Popular Marble Backsplash Styles and Patterns
Two layout styles dominate marble backsplash installations, each offering distinct visual and practical benefits.
Classic Subway Tile Layout
Subway tiles (typically 3″ × 6″ or 4″ × 12″) remain the most popular marble backsplash format. The rectangular shape is forgiving during installation, minor lippage (uneven tile edges) is less noticeable than with large-format tiles. Brick-pattern running bond (each tile offset by half) is standard, but stacked grid patterns and vertical orientations create different looks.
Marble subway tiles cost $8–$25 per square foot depending on marble type and finish. Polished finishes show veining dramatically but also reveal every fingerprint and water spot. Honed (matte) finishes hide smudges better and offer more slip resistance if the backsplash extends to a windowsill area.
Grout choice matters significantly with white and light-colored marble. White or light gray grout creates a seamless look but shows staining over time, especially near the cooktop. Mid-gray grout provides contrast while camouflaging inevitable discoloration. Grout joints should be ⅛” to ¼” for subway tiles, wider joints collect more grime and interrupt the stone’s natural pattern.
Statement Slab Backsplash
Book-matched marble slabs make a dramatic statement, especially in kitchens with minimal upper cabinetry. A slab backsplash uses large-format pieces (often 6–12 square feet per section) with continuous veining that mirrors across the centerline.
This approach eliminates grout lines almost entirely, creating a gallery-like backdrop. The stone appears as living art rather than tiled surface. Fabricators cut slabs to fit the exact space, with cutouts for outlets and switches.
Costs run significantly higher: $40–$100+ per square foot installed, depending on marble rarity and fabrication complexity. Homeowners should view slabs in person before purchasing, photos don’t capture the depth or color shifts in premium marbles like Calacatta Gold or Statuario. The fabricator will template the space, ensuring the most dramatic veining lands at eye level.
Installation requires professional fabricators, not a DIY project. Slabs weigh 12–15 pounds per square foot, and improper mounting can lead to catastrophic failure. Most installers use a combination of thinset adhesive and mechanical fasteners anchored into studs.
Choosing the Right Marble Type for Your Kitchen
Not all marble performs equally in kitchen environments. Three types dominate residential backsplash installations:
Carrara marble (white to blue-gray with soft, feathery veining) is the workhorse of marble backsplashes. It’s widely available, relatively affordable ($8–$18 per square foot for tiles), and its subtle patterning suits both traditional and contemporary kitchens. Carrara is softer than other marbles, meaning it’s more prone to scratching, but for vertical backsplash applications, this matters less than for countertops.
Calacatta marble (bright white with bold, dramatic gray or gold veining) is less common and more expensive ($15–$40+ per square foot). Its high-contrast veining makes a statement even in small doses. Calacatta works well as an accent behind the range, paired with simpler tile or painted walls elsewhere. Because it’s pricier, homeowners often limit it to focal areas rather than full-wall coverage.
Statuary or Statuario marble (pure white with defined, linear gray veining) sits at the top of the price spectrum ($30–$100+ per square foot). It’s quarried in limited quantities, making availability unpredictable. This marble is best reserved for kitchens where the backsplash is the primary design feature, worth the investment only when it’ll be properly showcased and maintained.
Finish matters as much as marble type. Polished marble reflects light beautifully but shows water spots, fingerprints, and etching more readily. Honed finishes (matte) are more forgiving and easier to maintain but don’t showcase veining as vividly. Tumbled or brushed finishes offer texture and hide imperfections but collect grime in surface irregularities, less ideal for areas near the cooktop.
Installation Considerations and Costs
Backsplash installation is a manageable DIY project for homeowners comfortable with tile work, but marble demands extra care compared to ceramic or porcelain.
Surface prep is non-negotiable. The wall must be smooth, clean, and structurally sound. Most installers apply ½” cement backer board over drywall for superior adhesion and moisture resistance. Backer board also prevents telegraphing (when wall imperfections show through tile). Fasten backer board to studs every 8″ with cement board screws.
Use white thinset mortar formulated for natural stone. Gray thinset can telegraph through white marble, creating shadowy discoloration. Spread thinset with a ¼” × ¼” square-notch trowel for subway tiles: larger tiles may require a ¼” × ⅜” notch. Back-buttering (applying a thin layer of thinset to the tile’s back) ensures full coverage and eliminates voids where tiles can crack.
Cutting marble requires a wet saw with a diamond blade rated for natural stone. Marble chips easily, so score cuts slowly and support pieces fully. Wear safety goggles and a dust mask, marble dust is a respiratory irritant. Nippers and a tile file handle small adjustments around outlets.
Outlet and switch boxes must sit flush with the finished tile surface. If they’re recessed, use box extenders before tiling. Cut outlet holes slightly larger than the box, covers will hide gaps.
Sealing should happen 24–48 hours after grouting. Use a penetrating sealer designed for marble (not topical sealers, which can yellow). Apply with a foam brush, let it absorb for 5–10 minutes, then buff off excess. Reseal annually or when water no longer beads on the surface.
Professional installation costs $10–$35 per square foot for labor, depending on pattern complexity and regional rates. DIY installation of 30 square feet of subway tile (a typical backsplash area) takes a full weekend for a first-timer. Slab installations are always professional jobs due to weight and precision requirements.
Maintaining and Protecting Your Marble Backsplash
Daily maintenance keeps marble backsplashes looking sharp. Wipe spills immediately, especially anything acidic. A damp microfiber cloth handles most messes. For grease splatters, use a pH-neutral stone cleaner or a few drops of dish soap in warm water. Avoid vinegar, lemon-based cleaners, and anything labeled “all-purpose”, these often contain acids or harsh chemicals that dull marble’s finish.
For stuck-on food, use a plastic scraper or a soft nylon brush. Never use abrasive pads (Scotch-Brite, steel wool) or powdered cleansers like Comet, they’ll scratch the surface.
Etching (dull spots from acid exposure) can’t be cleaned away, it’s actual surface damage. Minor etching can be polished out with marble polishing powder and a buffing pad, but deep etching requires professional refinishing. The best defense is prevention: seal regularly and clean spills fast.
Sealing frequency depends on use and marble type. High-traffic areas near the sink and stove may need sealing every 6–12 months. Less-used sections can go 12–18 months. Test by dripping water on the marble, if it darkens or absorbs rather than beading up, it’s time to reseal.
Grout requires separate attention. Seal grout lines with a grout sealer (not the same product used on marble) to prevent staining. Refresh grout sealer every 12 months. If grout discolors even though sealing, a grout pen in a matching shade can restore appearance without regrouting.
Long-term protection involves reasonable expectations. Marble will develop a patina, subtle surface changes that add character. Homeowners who want a permanently pristine surface may be happier with porcelain marble-look tile. Those who appreciate natural stone’s evolution will find marble’s aging process part of its charm. With attentive care and realistic expectations, a marble backsplash delivers decades of beauty and functionality.