Installing patio pavers transforms a backyard from basic to functional outdoor living space, and it’s one of the more achievable hardscape projects for a capable DIYer. Unlike poured concrete, pavers offer flexibility, easier repairs, and a finished look that holds up for decades when installed correctly. The catch? Success hinges on proper base preparation and precise leveling. Rushing the groundwork leads to settling, shifting, and drainage problems that show up within the first year. This guide walks through the entire process, from layout to the final joint sand, with realistic expectations about time, effort, and when to call in help.
Table of Contents
ToggleKey Takeaways
- Proper base preparation and compaction are critical to patio pavers installation success—skipping compaction is the leading cause of settling, shifting, and premature failure within the first year.
- Maintain a minimum 2% slope (¼ inch per foot) throughout your patio pavers layout to ensure water flows away from the house and prevent pooling, mosquitoes, and structural damage.
- Use coarse concrete sand (ASTM C33-compliant) for the bedding layer and polymeric sand for joints only—using play sand or mason sand will compromise stability and durability.
- Excavate 9–10 inches deep for standard 2⅜-inch pavers plus 4–6 inches of compacted gravel base and 1 inch of sand, and always call 811 before digging to locate underground utilities.
- Rent a plate compactor (non-negotiable for $60–90/day) and add 5–10% extra pavers to your order for cuts and breakage, depending on your pattern complexity.
Planning Your Patio Paver Project
Before ordering materials or breaking ground, the homeowner needs a clear plan that accounts for site conditions, local codes, and intended use.
Site Assessment: Walk the area and check for underground utilities, call 811 for a free locating service at least two business days before digging. Identify existing drainage patterns. Water should flow away from the house foundation at a minimum 2% slope (¼ inch per foot). If the site holds water after rain, the project may require additional drainage solutions like a French drain or catch basin.
Patio Size and Shape: Measure the space and sketch a layout. Rectangular patios simplify cutting and material estimates. Curves and circles add visual interest but increase labor and waste, expect 10–15% more pavers for complex designs. Standard paver sizes (4×8 inch, 6×6 inch, 6×9 inch) create different pattern options. Running bond and herringbone are popular and structurally stable: basket weave looks traditional but can shift without edge restraint.
Permits and Codes: Most municipalities don’t require permits for ground-level patios under 200 square feet, but rules vary. Patios adjacent to property lines may need setback clearances. If adding a fire pit, outdoor kitchen, or structures, check local zoning. It’s worth a call to the building department.
Material Quantity: Calculate square footage and add 5% for cuts and breakage on simple layouts, 10% for patterns with angles. For base materials, plan for 4–6 inches of compacted gravel plus 1 inch of bedding sand. A 120-square-foot patio needs roughly 1.5–2 tons of gravel and 0.5 tons of sand, depending on excavation depth and existing soil conditions.
Essential Tools and Materials You’ll Need
Paver installation doesn’t demand specialty equipment, but having the right tools makes the difference between a weekend project and a week-long struggle.
Tools:
- Plate compactor (rent, don’t skip, hand tampers won’t cut it for base stability)
- Wheelbarrow and square-point shovel
- Level (4-foot or longer) and string line
- Rubber mallet
- Masonry saw or angle grinder with diamond blade for cuts (a circular saw with masonry blade works for straight cuts)
- Tape measure, carpenter’s pencil, stakes
- Safety gear: gloves, safety glasses, hearing protection, dust mask for cutting
- Landscape rake and stiff-bristle broom
Materials:
- Pavers (concrete, natural stone, or porcelain, concrete is most DIY-friendly)
- Crushed stone or gravel base (¾-inch minus with fines, also called “class II road base” or “crusher run”)
- Coarse bedding sand (NOT play sand or mason sand, use concrete sand or ASTM C33-compliant sand)
- Polymeric sand or standard joint sand for gaps
- Edge restraint (plastic paver edging with spikes, or aluminum for curves)
- Landscape fabric (optional, debated, useful for weak soils, can trap water in clay)
- Stakes and marking paint
Renting a plate compactor runs $60–90 per day. It’s non-negotiable. Skipping compaction is the number one cause of paver failure.
Step-by-Step Patio Pavers Installation Process
Preparing the Base and Excavation
Step 1: Mark the Layout
Use stakes and string to outline the patio perimeter. Mark the high point (typically against the house foundation) and establish slope with a string level and measuring tape. For every 10 feet of run, the patio should drop 2.5 inches minimum.
Step 2: Excavate
Dig out the area to a depth that accommodates the base, sand, and paver thickness, plus 1 inch to sit slightly above grade. For standard 2⅜-inch thick concrete pavers with a 6-inch base and 1-inch sand layer, excavate roughly 9–10 inches below the desired finished height. Remove all organic material, roots, and soft soil. A flat shovel and wheelbarrow are the workhorses here, this step is physically demanding and takes longer than most DIYers expect.
Step 3: Compact Native Soil
Run the plate compactor over the excavated area in overlapping passes. This prevents future settling. If soil is loose sand or heavy clay, results vary, consult a local landscaper for problem soils.
Step 4: Add and Compact Base Material
Spread 2–3 inches of gravel, rake level, then compact. Repeat in lifts until reaching 4–6 inches total compacted depth. Each layer must be compacted before adding the next. Check slope frequently with a long level. Patience here pays off.
Step 5: Install Edge Restraint
Secure plastic or aluminum edging along the perimeter with 10-inch spikes every 12–16 inches. Edging prevents pavers from creeping outward over time. For curves, use flexible edging or multiple short sections.
Step 6: Spread Bedding Sand
Add 1 inch of coarse sand over the compacted base. Screed it flat using a notched 2×4 or metal screed rails. Do NOT compact the sand layer, it cushions the pavers and allows for minor leveling adjustments during placement.
Laying and Securing Your Pavers
Step 7: Start Laying Pavers
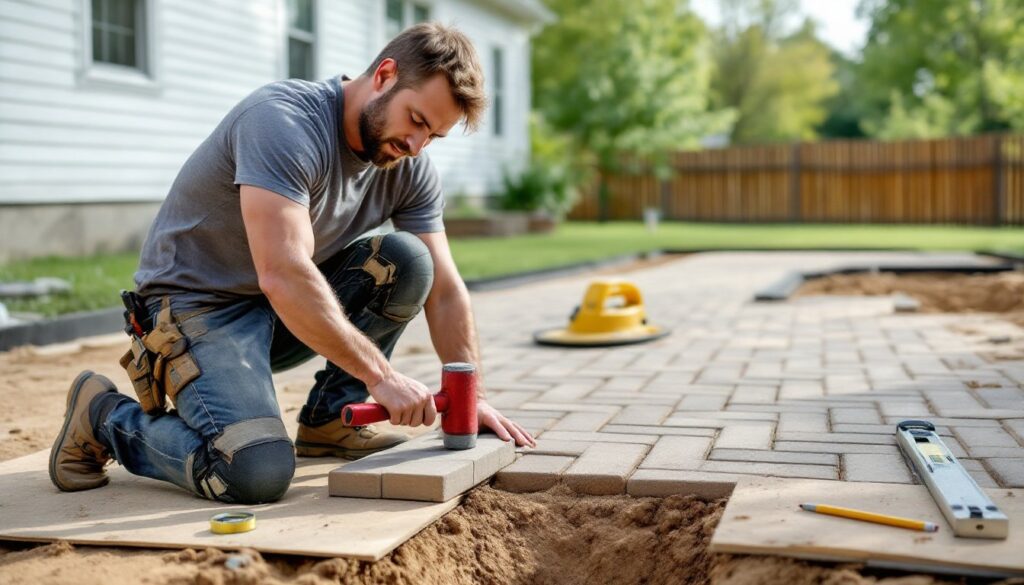
Begin in a corner or against a straight edge (like the house foundation). Work outward in your chosen pattern, keeping joints tight, about ⅛ inch apart. Use a rubber mallet to tap pavers into place, checking level every few rows. Kneel on a piece of plywood to distribute weight and avoid disturbing the sand bed.
Step 8: Cut Edge Pavers
Measure and mark pavers that need trimming to fit borders or curves. A masonry saw (wet saw) gives the cleanest cuts with less chipping: an angle grinder with diamond blade works for smaller jobs. Always wear eye and hearing protection, concrete dust and noise are serious hazards.
Step 9: Compact the Pavers
Once all pavers are set, run the plate compactor over the surface. Use a rubber mat attachment if available to prevent scuffing. This seats the pavers into the sand bed and levels minor height differences.
Step 10: Fill the Joints
Sweep polymeric sand into the joints with a stiff broom, making multiple passes to fill gaps completely. Polymeric sand hardens when activated with water, locking pavers in place and resisting weeds and washout. For a budget option, use standard joint sand, but expect to refill periodically.
Step 11: Activate and Cure
Mist the patio lightly with water to activate polymeric sand. Avoid heavy spray that washes sand out. Let cure per manufacturer instructions (usually 24–48 hours) before heavy use. Some products require a second watering.
Common Mistakes to Avoid During Installation
Even experienced DIYers trip up on paver projects. Here’s what to watch for.
Skipping Compaction: Loose base material will settle unevenly, creating dips and trip hazards within months. Compact in lifts, never dump 6 inches and compact once.
Using the Wrong Sand: Play sand or fine mason sand doesn’t provide stability. Coarse concrete sand or C33-spec sand is essential for the bedding layer. Polymeric sand goes in joints only, not as a bed.
Ignoring Slope: Standing water ruins pavers and invites mosquitoes. Always slope away from structures at 2% minimum. Check slope multiple times during base prep.
Poor Edge Restraint: Pavers shift outward under traffic. Spiked edging must be installed before laying pavers and driven firmly into the base, not just sand.
Cutting Corners on Excavation: Too-shallow base leads to frost heave in cold climates and settling everywhere else. Don’t cheat the depth.
Working Alone on Heavy Lifts: Pavers are manageable individually, but moving a pallet or operating a compactor on slopes can be risky. Get help when needed.
Rushing Joint Sand: Filling joints in wind or rain makes a mess and wastes material. Pick a calm, dry day and follow product curing instructions.
Conclusion
A well-installed paver patio delivers decades of low-maintenance outdoor living space and typically adds value to the property. The job is labor-intensive, expect a weekend for a modest patio, longer for larger or complex layouts, but the skills involved are straightforward. Focus on a solid, well-compacted base, maintain proper slope, and don’t rush the details. If the site has drainage issues, unstable soil, or requires grading changes near the foundation, consult a professional before starting. Otherwise, this is a rewarding project that most confident DIYers can tackle with the right preparation and patience.